Last night meatballs were on the menu for dinner. I made enough meatballs and sauce to make meatball hoagies and spaghetti and meatballs. They were fabulous as usual. My recipe is very easy, no fancy footwork involved to make these. Easy and tasty is my recipe for success!
Italian Meatballs
2 lbs ground beef
1 cup Italian bread crumbs
1 egg
1 tsp oregano
2 cloves garlic (minced)
1 Tbsp fresh basil (chopped)
salt and pepper to taste
Mix all in a bowl (I find it easiest to mix with my hands, so either wash really really good or wear powderless gloves to mix) until all is mixed thoroughly. Preheat oven to 350 degrees. Roll into balls. Bake on broiler pan (so any grease goes to the bottom and your meatballs do not cook in it, it helps to hold their shape and not to taste greasy) for 30 minutes. Add to favorite sauce or soup.
Serving Suggestions:
- You can make meatball sandwiches, and garnish with some grated parmesan or mozzarella cheese
- Serve with favorite pasta and cheese, such as spaghetti and meatballs (one of my family favorites)
These can be frozen and last longest when vacuum sealed in bags. Just add frozen meatballs to pasta sauce in a crockpot to heat them right up for dinner.
Thursday, February 26, 2009
Italian Meatballs... my way!
Wednesday, February 25, 2009
Corny Fried Chicken
Corny Fried Chicken is one of my creations using corn meal in the fried chicken batter. I wanted something different than standard fried chicken and started putting things in the bowl to give my chicken some great flavor. A touch of cinnamon gives it a really nice flavor that goes well with the paprika, garlic, and corn meal (which are the main flavors in my opinion). Just give this a try, it is very good for fried chicken.
Corny Fried Chicken
1 fryer chicken cut into pieces
2/3 cup all purpose flour
1/3 cup corn meal
1 tsp granulated garlic, or you can use one clove garlic minced
1 tsp paprika
1/2 tsp pepper
1/2 tsp salt
1/4 tsp cinnamon
1/4 tsp baking powder
1 egg, beaten
1/2 cup milk
2 Tbsp cooking oil
Vegetable oil for frying
Boil the chicken pieces for about 20 minutes.
Mix together flour, corn meal, garlic, paprika, pepper, salt, cinnamon, and baking powder. In a separate bowl, beat the egg; add milk and cooking oil. Add wet ingredients to dry ingredients and mix well with wire whisk.
Pat the chicken dry with paper towels. Heat oil to 360 degrees. Dip chicken pieces in batter and fry about 3-4 minutes or until golden brown. Fry a 3-4 pieces at a time. Let drain on paper towels, serve hot.
Notes:
- For a little extra kick, add some dried or prepared mustard to batter.
- Make sure the oil is hot enough before adding the chicken, or else the batter will absorb more grease and it will be greasy. Test oil with a couple drops of water, if they sizzle and pop, the oil is ready.
Danish Aebelskiver From Melinda Lee's Great Site
This is a cool recipe I found on this site Melinda Lee's page for Aebelskiver and then I used my own homemade raspberry jam for one filling and my homemade applesauce for the other filling. We just wanted something different for breakfast one day, and I had just seen something about these little gems on Food Network. I thought I have one of those pans, that looks fun for the kids while preparing something different than the same old pancakes or waffles. They went over big! It is some extra work but they tasted so good. Just visit Melinda Lee's site, she has all kinds of great foods on there, this particular page takes you to her Aebelskiver recipe.
Here is the pan you use:
You can get one of these at Aebelskiver Pan page from Cre8tive Kitchen Store. They come in cast iron, or aluminum. Cast iron is better and they are not expensive at all.
With the raspberry filling, I sprinkled them with powdered sugar and garnished with more raspberry jam, you can also put a little dollop of whipped cream on the side also.
With the applesauce filling, I made a crumb topping with some butter, brown sugar and a little cinnamon. It carmelizes over the hot aebelskiver and then you can serve some additional applesauce on the side. Caramel would probably be really good with them to make a dessert aebelskiver too. Then some whipped cream wouldn't hurt either.
Just check out Melinda Lee's site for more great ideas for all sorts of great recipes and then check out my store for the kitchen tools needed to pull off some of her recipes.
Friday, February 20, 2009
Fast Peanut Butter Cup Cake
I know all about the peanut butter scare but I did my homework with my peanut butter when I made this cake for work in January. Happy to say that no one that ate this cake got sick and it had quite a bit of peanut butter products in it (a silent YAY me going on here for no one getting sick). Anyway, this is such a decadent looking and tasting cake that no one would ever know that it came from a cake mix rather than homemade. I know it is almost like blasphemy to not make my cakes all homemade but when making for alot of people with not much time, this would be the second way to go. I did make the peanut butter frosting homemade, no store bought frosting here.
Fast Peanut Butter Cup Cake
2 boxes of chocolate cake mix (I used dark chocolate cake mixes for a double layer sheet cake)
1 batch of peanut butter frosting (recipe follows)
1 10 oz bag of peanut butter cups (chopped)
Prepare cakes according to box directions. Let cool, frost bottom layer with peanut butter frosting, then a layer of chopped up peanut butter cups. Place top layer onto bottom layer and frost tops and sides of cake. Put the rest of the chopped peanut butter cups around the sides of cake to give a more decadent look. Refrigerate cake.
(Disregard the uncreative decorating, it was a cake for work for January birthdays; this is how the sides should look after placing peanut butter cups onto cake, I probably could have used more peanut butter cups though.. oh well I will remember that for next time)
Suggestions:
- To make a round layer cake for less people, use one box of cake mix prepared for a double layer cake, cut the frosting recipe in half.
Peanut Butter Frosting
1/3 cup creamy peanut butter
4 cups powdered sugar
1 tsp vanilla
5-7 Tbsp milk (use enough until desired consistency is reached)
Beat the peanut butter until very smooth, gradually beat in powdered sugar, add vanilla. Then add milk 1 Tbsp at a time until desired consistency is reached. Frost cake.
Thursday, February 12, 2009
Peaches and Cream Tarts
Here is a great dessert for your sweetheart if they do not like decadent chocolate. (I cannot imagine why someone would not like chocolate but this is a good one and one of my husbands favorites). It utilizes my cream cheese sugar cookie dough for the crust which is located in my Holiday Cookies and Treats category of my blog. It simple and very fast to make. Other variations will follow below.
Peaches and Cream Tarts
Tart shells made from cream cheese sugar cookie dough
vanilla pudding
2 cups sliced peaches (fresh or frozen)
1/4 cup sugar
whipped cream
cinnamon sprinkles for the top
Make the cookie dough according the directions in my blog post about Cream Cheese Sugar Cookies Bake in 375 oven for about 12 minutes or until edges barely get browned. Cool on wire racks. Invert out of the tart pans when cooled off.
Meanwhile make pudding according to package directions (I get instant pudding which is fast setting)
Mix the sliced peaches with the sugar; set aside.
To build the tarts:
With an empty shell, fill 1/2 way with pudding. Put in refrigerator to set. About an hour.
Top with peaches, garnish with whipped cream and sprinkle cinnamon on top if desired.
Other Variations:
- use strawberries, garnish with whipped cream and chocolate sprinkles or shavings
- use blueberries, garnish with finely grated lemon peel
- use raspberries, garnish with chocolate
Cream Cheese Sugar Cookies
These are by far the best sugar cookie on the planet. They get crispy in the oven but yet stay soft and yummy after they are baked. (but then again, I like my cookies soft). They hold up really well when frosting for holidays, yet they also make great crusts for tartlets, fruit pizza, and anything else where you need a cookie crust. They are great by themselves with a cup of coffee, or decked out with frosting for holiday cookies. This is the cookie recipe I use for all my cut out cookies, with the latest time was making cookies for my daughter's Valentine's party at her school, she said they were a hit. No wonder, they are the best sugar cookie on the planet! Pictured below will be the same sugar cookie recipe used for our Christmas cookies we made and decorated. They were beautiful, only because my daughters decorated them.
Cream Cheese Sugar Cookies
1 cup butter or margarine
6 oz cream cheese
4 cups flour
2 cups sugar
2 eggs
1 tsp baking powder
1 tsp vanilla
Beat margarine or butter and cream cheese until smooth with electric mixer for about 30 seconds. Add about half the flour, sugar, eggs, baking powder, and vanilla. Beat till thoroughly combined. Beat in remaining flour. Cover and chill for 1 hour or until dough is easy to handle.
Divide the chilled dough in half. On a lightly floured surface, roll half the dough at a time 1/8 inch thickness. Cut into desired shapes with cookie cutters. Place 1 inch apart on ungreased cookie sheet (I line my cookie sheets with parchment paper, it works really well)
Bake in 375 oven for about 8-10 minutes or until edges are lightly browned. Cool cookies on wire rack.
Variation:
Chocolate Cream Cheese Cookies: Prepare as above, except add 2 squares semisweet chocolate, melted and cooled, with the first half of the flour.
Here pictured is our Christmas cookies made with this sugar cookie dough, aren't they pretty? I think they are, the girls did a great job decorating them.
Chocolate Molten Cakes with Raspberry Sauce
This by far was the best dessert (besides cheesecake of course) that has been invented. If you are a serious chocolate person, than this dessert is for you. It is eaten warm so that the chocolate center oozes out and pair that up with my Raspberry Sauce or some vanilla ice cream and this is a dessert sure to please any sweet tooth.
Chocolate Molten Cakes with Raspberry Sauce
6 oz chocolate chips (about 2/3 cup)
3/4 stick of butter (6 Tbsp)
1/4 cup unsweetened cocoa
4 egg whites
1/8 tsp cream of tarter
2 Tbsp sugar
Raspberry Sauce (recipe follows cake directions)
Preheat oven to 400 degrees. Melt the chocolate and butter together and stir frequently on the stove. Or microwave in 30 second intervals until all melted and then stir together until smooth. Once chocolate and butter are smooth, sift in the cocoa until smooth.
In a different bowl, mix together the egg whites and cream of tarter on medium speed for about 3 minutes; this should make small peaks. Then add sugar and beat on high until the peaks are stiff. Fold 1/4 of the egg whites into chocolate at a time until all has been added. Be careful not to over stir the mixture.
Butter and sugar the baking dishes (ramekins work best for me). Bake for 7-10 minutes. It will be slightly soft in the middle and the cake will have risen however, once you take it out it will fall a little. When the cake has come away from the edges, flip over onto small serving plate. The cake should be done on the outside, yet still gooey in the middle. Serve hot with a dollop of whipped cream and raspberry sauce.
Raspberry Sauce:
1 cup fresh or frozen raspberries
1/4 cup sugar
1 Tsp orange juice
Puree in a blender until all are combined. Spoon over favorite desserts. Store in the refrigerator.
Other Serving Suggestions:
- Serve warm with vanilla ice cream
- Serve warm drizzled with caramel sauce and whipped cream or ice cream
- Dust with powdered sugar and serve hot
Wednesday, February 11, 2009
Latest Cakes
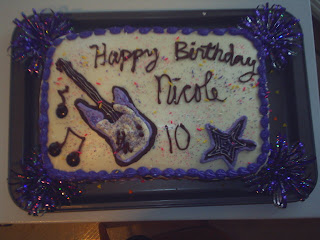
In the past couple months, I have been busy with 2 occasions in which I had to make cakes. I had both my daughter's birthday cakes to make within about 10 days of each other.
Here are some pictures of my latest cakes and some of the tips to decorating them.
The first cake was my oldest daughter's cake for her 10th birthday and she is a Hannah Montana fan... a BIG fan! I call this cake the Best of Both Worlds cake and it was double layer sheet cake with one chocolate layer and one white layer. The frosting is just basic buttercream with some tinted purple for the trim and between the layers. The music notes are made with Junior Mints candies with the stems of the notes just piped on. The guitar is made with chocolate bark melted and freehand cut into the shape of a guitar and then decorated. The star is also made with chocolate bark.
The second cake was for my daughter Vanessa's 4th birthday. She is a Dora the Explorer fan and that is what she wanted. So we just went and bought the pan and I made the cake. I just used a basic buttercream icing recipe and tinted it all those colors. The eyes and trim are with a Wilton tip #3, the stars are with Wilton tip #16, and the border was with Wilton tip #21. It took me about 4 hours to frost it but she loved it for her birthday. It was a great success!
Here is the closeup of the face so you can see how intricate it gets piping on those stars for most of the cake.
It was a lot of fun doing these cakes. I also make the cakes for my co-workers monthly birthdays and some of them will be getting creative and I will post the photos from those also. This should be fun!
Tuesday, February 10, 2009
Old Fashioned Baked Cheezecake
This cheesecake is the best baked cheesecake I have eaten. It is very light and creamy and goes wonderful with fruit toppings or just plain. It is easy to make, but it is time consuming. Despite the fact that it has 5 packages of cream cheese in it, it tastes lighter than most cheesecakes I have had. Got a special dinner you are cooking for your loved one this Saturday night? Serve this cheesecake for dessert and have him or her eating out of the palm of your hand. For sure!
Old Fashioned Baked Cheezecake
Crust:
1 1/4 cups crushed graham cracker crumbs
3 Tbsp butter
3 Tbsp sugar
Melt the butter. Mix the sugar into the graham cracker crumbs. Add the melted butter. Mix and press into bottom of spring form pan. Bake the crust for 10 minutes at 350 degrees. Let it cool. Leave the oven on for the cheesecake to bake later.
Filling:
3 Tbsp all purpose flour
1 cup sour cream (cold)
1 cup heavy cream (cold)
5 packages of cream cheese (never the low-fat kind)
1 cup sugar
2 tsp vanilla
4 large eggs (at room temperature)
Cream the cheese with the sugar on high speed. Add 2 tsp vanilla. Add the eggs one at a time continuing to beat on medium speed. (only use medium speed after the cream cheese is creamed). Add the flour. Turn mixer on low speed and add in the sour cream. Stop the mixer after this addition.
In a separate bowl, beat the heavy cream until it stiffens. Fold the whipped cream into the cream cheese batter.
Pour into the pan and bake in the middle of the oven at 350 degrees for 60 minutes. The cake will rise out of the pan: not to worry, it should just brown around the edge and begin to set up in the middle. At that time, shut off the oven, move the cheesecake to the front of the oven and open the oven door about the width of a hand and leave door open. When the pan is cool enough to pick up, take out of the oven and cool on counter for 1 hour. DO NOT REMOVE THE SPRING FORM PAN
After the hour, run a knife around the inside of the pan to separate the cake from the edge. Cool overnight before removing the spring form pan. Enjoy!!
Tips:
- if preparing for a special occasion, make sure you make it the day before so it will be ready for your special occasion
- Serve with any fruit topping and whipped cream for an extra treat.
- Drizzle with chocolate sauce and raspberry sauce for more elegant treat.